Table of Contents
Docker desktop 에 istio 를 설치하는 방법
배경
최근 istio 스터디에 참여하고 있는데 istio 를 설치하기 위해서 kubernetes 클러스터 환경이 필요했다. 문득 로컬 docker desktop 에 kubernetes 지원이 있었던 기억이 나서 이 옵션을 활성화하여 docker desktop 에서 istio 를 설치해보았다.
설치 환경
- istio 1.9.1
- docker desktop 설치된 환경 (RAM 이 넉넉해야한다.)
Docker desktop 준비사항
-
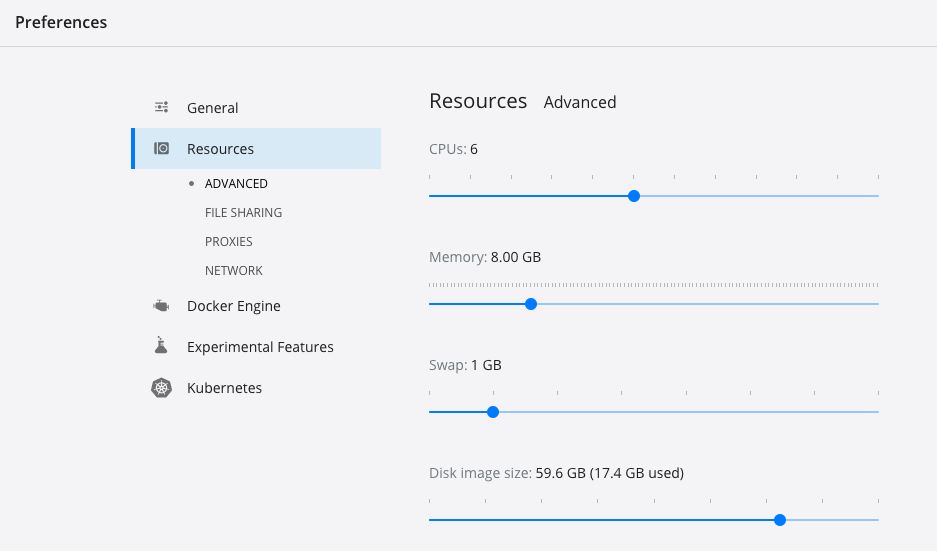
먼저 resource 에서 CPU 4cpu 이상, RAM 할당을 8G 로 늘려주자.
-
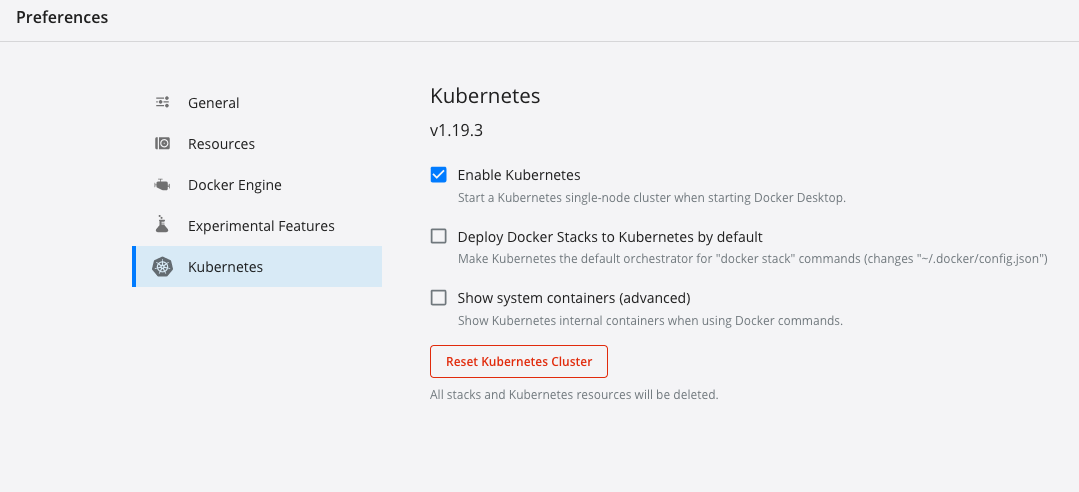
그 다음으로 kubernetes 클러스터를 활성화 시켜주자.
-
클러스터가 잘 활성화 되었다면 다음과 같이 확인할 수 있다.
$ kubectl get nodes
NAME             STATUS   ROLES    AGE   VERSION
docker-desktop   Ready    master   2h    v1.19.3
istioctl 설치
brew 를 사용해서 istioctl 을 설치해두자.
$ brew install istioctl
$ istioctl version
1.9.1
istio sample 예제 clone
$ git clone https://github.com/istio/istio.git
$ cd istio
istio 설치
istio 를 활성화한 kubenetes cluster 에 설치해보자.
operator init
이전 버전과 다르게 최근 istio 에서는 operator 를 사용한 설치가 가능하다. 편리하게 사용해주자. (airflow 도 operator 로 설치했던 기억이..)
# --tags 를 붙여서 다른 버전을 설치할 수도 있다. 기본은 최신버전이 설치됨
# istio-operator controller 설치 + IstioOperator CRD(Custom Resource Definition) 설치됨

$ istioctl operator init
Installing operator controller in namespace: istio-operator using image: docker.io/istio/operator:1.9.1
Operator controller will watch namespaces: istio-system
✔ Istio operator installed
✔ Installation complete
IstioOperator apply
ingress gateway 를 활성화 하기 위해서 demo profile 로 IstioOperator 를 apply 하자.
$ kubectl create ns istio-system
$ kubectl apply -f - <<EOF
apiVersion: install.istio.io/v1alpha1
kind: IstioOperator
metadata:
  namespace: istio-system
  name: example-istiocontrolplane
spec:
  profile: demo # profile demo 로 하면 컴포넌트를 쭈루룩 설치한다.
  components:
    pilot:
      k8s:
        resources:
          requests:
            memory: 3072Mi # pilot 에는 메모리를 넉넉하게 할당하였다.
    egressGateways:
    - name: istio-egressgateway # 외부로 나가는 트래픽을 egressgateway 를 통하도록 활성화 한다.
      enabled: true
EOF
- profile 에 따라서 설치되는 컴포넌트의 차이가 난다. 지금은 동작 확인을 위해서
demo profile로 설치하지만 production 에서는 customization 이 필요할 수도 있다. 자세한 프로필 옵션은 매뉴얼 링크를 참고하자. - 위의 예시로 설치하면 다음의 컴포넌트가 설치된다.
- istio-egressgateway
- istio-ingressgateway
- istiod
istio-ingressgateway
envoy 로 되어 있으며 들어오는(ingress) 트래픽을 전달하는 역할을 수행한다. istio 가 없을 때 ingress controller (주로 nginx 로 구동되는)가 이 역할을 수행한다. (경우에 따라 nginx ingress controller + envoy istio ingress gateway 조합으로도 구성하기도 한다고..)
istio-egressgateway
마찬가지로 envoy 로 동작하며 밖으로 나가는(egress) 트래픽을 제어하는 역할을 수행한다. 어떤 경우에 쓰이냐면, 클러스터 외부에 있는 인프라에서 제한된 ACL 을 필요로 할 때 egress-gateway 가 구동되는 위치를 일부 node들로 제한하고 이 Node 들에 대해서만 ACL 을 열어주는 용도로 사용될 수 있다.
istiod
istio 의 컨트롤 플랜 (pilot - discovery , citadel - certification, galley - configuration management)

추가 컴포넌트 설치
- 이전 버전에서는 demo 프로필로 설치하면 kiali, 등등의 컴포넌트가 많이 설치되었는데 최신버전에서는 추가 컴포넌트는 따로 설치해줘야 한다. (이렇게 변경된 이유는 kiali, zipkin, Prometheus와 같은 컴포넌트는 istio 의 core 컴포넌트가 아니고 이 녀석들도 버전업이 빨라서 demo profile 에 같이 포함시켰더니 버전업 대응하기가 어려웠다고 한다. 따라서 그 때그때 필요한 사람들이 add components 하라고 안내하고 있다.)
$ cd istio/samples/addons
$ kubectl apply -f prometheus.yml
$ kubectl apply -f kiali.yml
$ kubectl apply -f grafana.yml
$ kubectl apply -f jaeger.yaml
설치 확인
Service
$ kubectl get svc -n istio-system
NAME                   TYPE           CLUSTER-IP       EXTERNAL-IP   PORT(S)
grafana                ClusterIP      10.96.62.176     <none>        3000/TCP
istio-egressgateway    ClusterIP      10.97.243.254    <none>        80/TCP,443/TCP,15443/TCP
istio-ingressgateway   LoadBalancer   10.96.161.146    localhost     15021:30511/TCP,80:30544/TCP,443:31492/TCP,31400:30865/TCP,15443:32030/TCP
istiod                 ClusterIP      10.103.241.162   <none>        15010/TCP,15012/TCP,443/TCP,15014/TCP
jaeger-collector       ClusterIP      10.106.227.172   <none>        14268/TCP,14250/TCP
kiali                  ClusterIP      10.109.82.172    <none>        20001/TCP,9090/TCP
prometheus             ClusterIP      10.106.47.148    <none>        9090/TCP
tracing                ClusterIP      10.99.41.58      <none>        80/TCP
zipkin                 ClusterIP      10.105.51.116    <none>        9411/TCP
Pods
NAME                                   READY   STATUS    RESTARTS
grafana-f766d6c97-5gj64                1/1     Running   0
istio-egressgateway-5d748f86d5-2drv7   1/1     Running   0
istio-ingressgateway-67d647b4-xhjh5    1/1     Running   0
istiod-69ccd7b848-9vwck                1/1     Running   0
jaeger-7f78b6fb65-xp4sm                1/1     Running   0
kiali-59c8574c55-zvlcr                 1/1     Running   0
prometheus-69f7f4d689-4cswz            2/2     Running   0
네임스페이스에 istio-injection 라벨 추가
사이드카를 활성화할 default namespace 에 istio-injection=enable 라벨을 적용한다.
$ kubectl label namespace default istio-injection=enabled
namespace/default labeled
BookInfo 예제 실행
sample yml 예제 적용
$ kubectl apply -f samples/bookinfo/platform/kube/bookinfo.yaml
service/details created
serviceaccount/bookinfo-details created
deployment.apps/details-v1 created
service/ratings created
serviceaccount/bookinfo-ratings created
deployment.apps/ratings-v1 created
service/reviews created
serviceaccount/bookinfo-reviews created
deployment.apps/reviews-v1 created
deployment.apps/reviews-v2 created
deployment.apps/reviews-v3 created
service/productpage created
serviceaccount/bookinfo-productpage created
deployment.apps/productpage-v1 created
bookinfo 서비스 확인
$ kubectl get svc
NAME          TYPE        CLUSTER-IP       EXTERNAL-IP   PORT(S)    AGE
details       ClusterIP   10.110.253.197   <none>        9080/TCP   7s
kubernetes    ClusterIP   10.96.0.1        <none>        443/TCP    2d
productpage   ClusterIP   10.109.81.216    <none>        9080/TCP   7s
ratings       ClusterIP   10.109.38.26     <none>        9080/TCP   7s
reviews       ClusterIP   10.101.176.215   <none>        9080/TCP   7s
pods 확인
- pod 상태를 확인하자. docker desktop 에서 띄우려니 사이드카 뜨는데 시간이 좀 걸린다. ready 2/2 보려고 조금 기다렸다.
$ kubectl get pods -w
NAME                              READY   STATUS    RESTARTS   AGE
details-v1-79f774bdb9-v7wq7       2/2     Running   0          3m27s
productpage-v1-6b746f74dc-sgwxh   2/2     Running   0          3m26s
ratings-v1-b6994bb9-mjhkg         2/2     Running   0          3m26s
reviews-v1-545db77b95-p9lkm       2/2     Running   0          3m27s
reviews-v2-7bf8c9648f-gmckn       2/2     Running   0          3m27s
reviews-v3-84779c7bbc-qtrc8       2/2     Running   0          3m27s
curl 요청 결과 확인
다음과 같이 Simple Bookstore App 이라는 문자열을 확인할 수 있으면 된다.
$ kubectl exec "$(kubectl get pod -l app=ratings -o jsonpath='{.items[0].metadata.name}')" -c ratings -- curl -sS productpage:9080/productpage | grep -o "<title>.*</title>"
<title>Simple Bookstore App</title>
네트워킹 설정 추가
아직 브라우저에서 편하게 접속하기가 어렵다. 네트워킹 설정을 추가하자
$ kubectl apply -f samples/bookinfo/networking/bookinfo-gateway.yaml
gateway.networking.istio.io/bookinfo-gateway created
virtualservice.networking.istio.io/bookinfo created
설치된 gateway 를 확인할 수 있다.
$ kubectl get gateway
NAME               AGE
bookinfo-gateway   6s
접속 확인
External IP 확인
현재 Docker desktop 환경에서는 LoadBalancer 의 External IP 가 localhost 로 나온다.
$ kubectl get svc -n istio-system
NAME                   TYPE           CLUSTER-IP       EXTERNAL-IP   PORT(S)                                                                      AGE
grafana                ClusterIP      10.96.62.176     <none>        3000/TCP                                                                     12h
istio-egressgateway    ClusterIP      10.97.243.254    <none>        80/TCP,443/TCP,15443/TCP                                                     3h16m
istio-ingressgateway   LoadBalancer   10.96.161.146    localhost     15021:30511/TCP,80:30544/TCP,443:31492/TCP,31400:30865/TCP,15443:32030/TCP   3h16m
istiod                 ClusterIP      10.103.241.162   <none>        15010/TCP,15012/TCP,443/TCP,15014/TCP                                        3h16m
jaeger-collector       ClusterIP      10.106.227.172   <none>        14268/TCP,14250/TCP                                                          12h
kiali                  ClusterIP      10.109.82.172    <none>        20001/TCP,9090/TCP                                                           12h
prometheus             ClusterIP      10.106.47.148    <none>        9090/TCP                                                                     12h
tracing                ClusterIP      10.99.41.58      <none>        80/TCP                                                                       12h
zipkin                 ClusterIP      10.105.51.116    <none>        9411/TCP                                                                     12h
따라서 현재 istio-ingressgateway 가 LoadBalancer 타입으로 활성화 되어 localhost 를 통해서 접속이 가능하다는 것을 의미한다. 만약 minikube와 같이 다른 환경인 경우에는 각각의 external IP 또는 NodePort 를 활용하여 접속해야하므로 추가 작업이 필요하다. 매뉴얼 링크
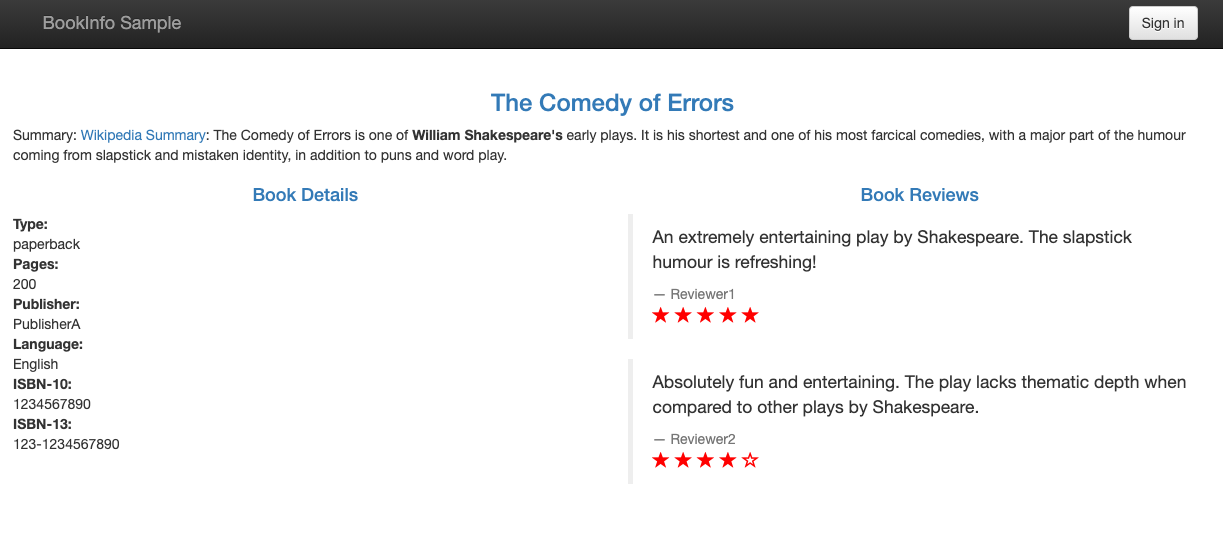
브라우저 확인
정상적으로 작업이 완료되었다면
http://localhost/productpage 로 접속이 잘 된다. 여러번 새로고침해보면서 rating 영역이 바뀌는 것을 볼 수 있다.
추가 컴포넌트 확인
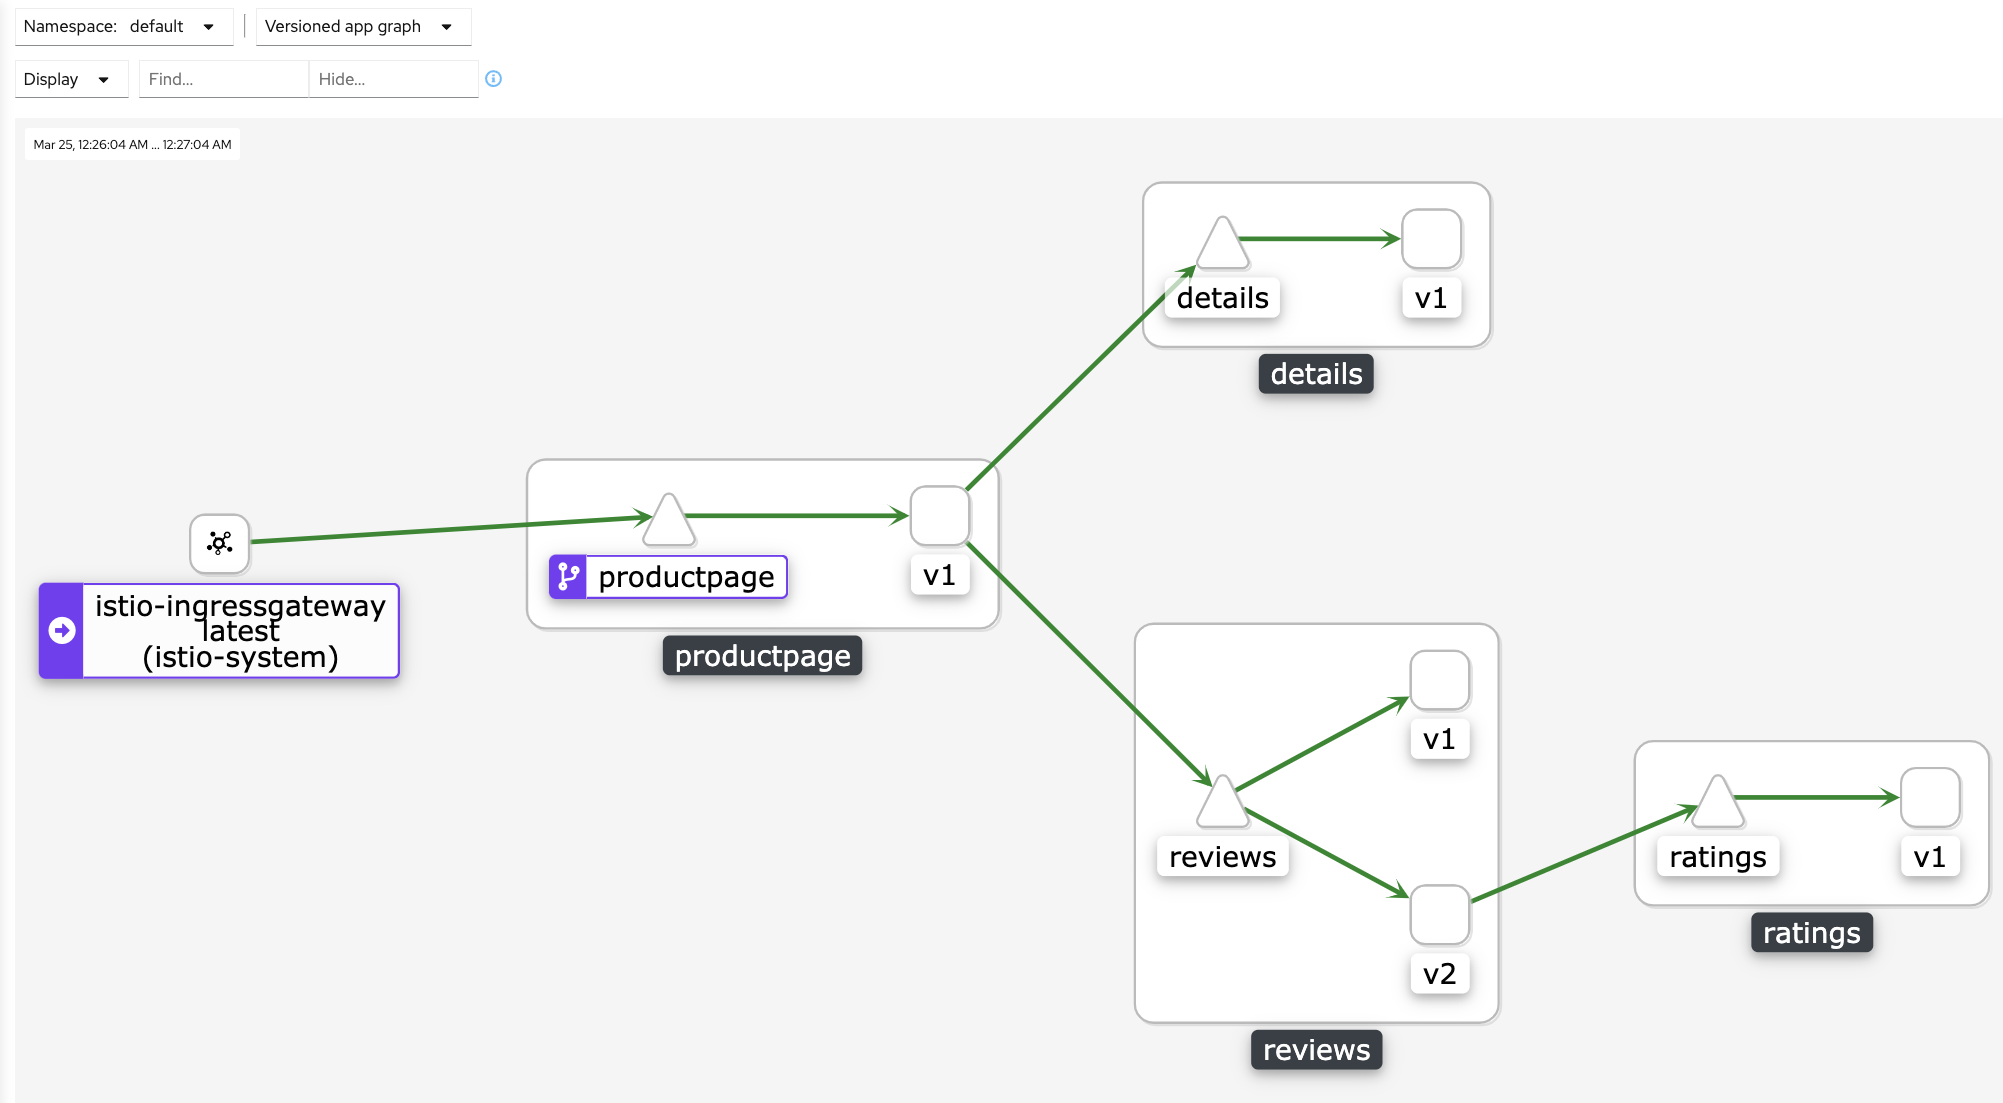
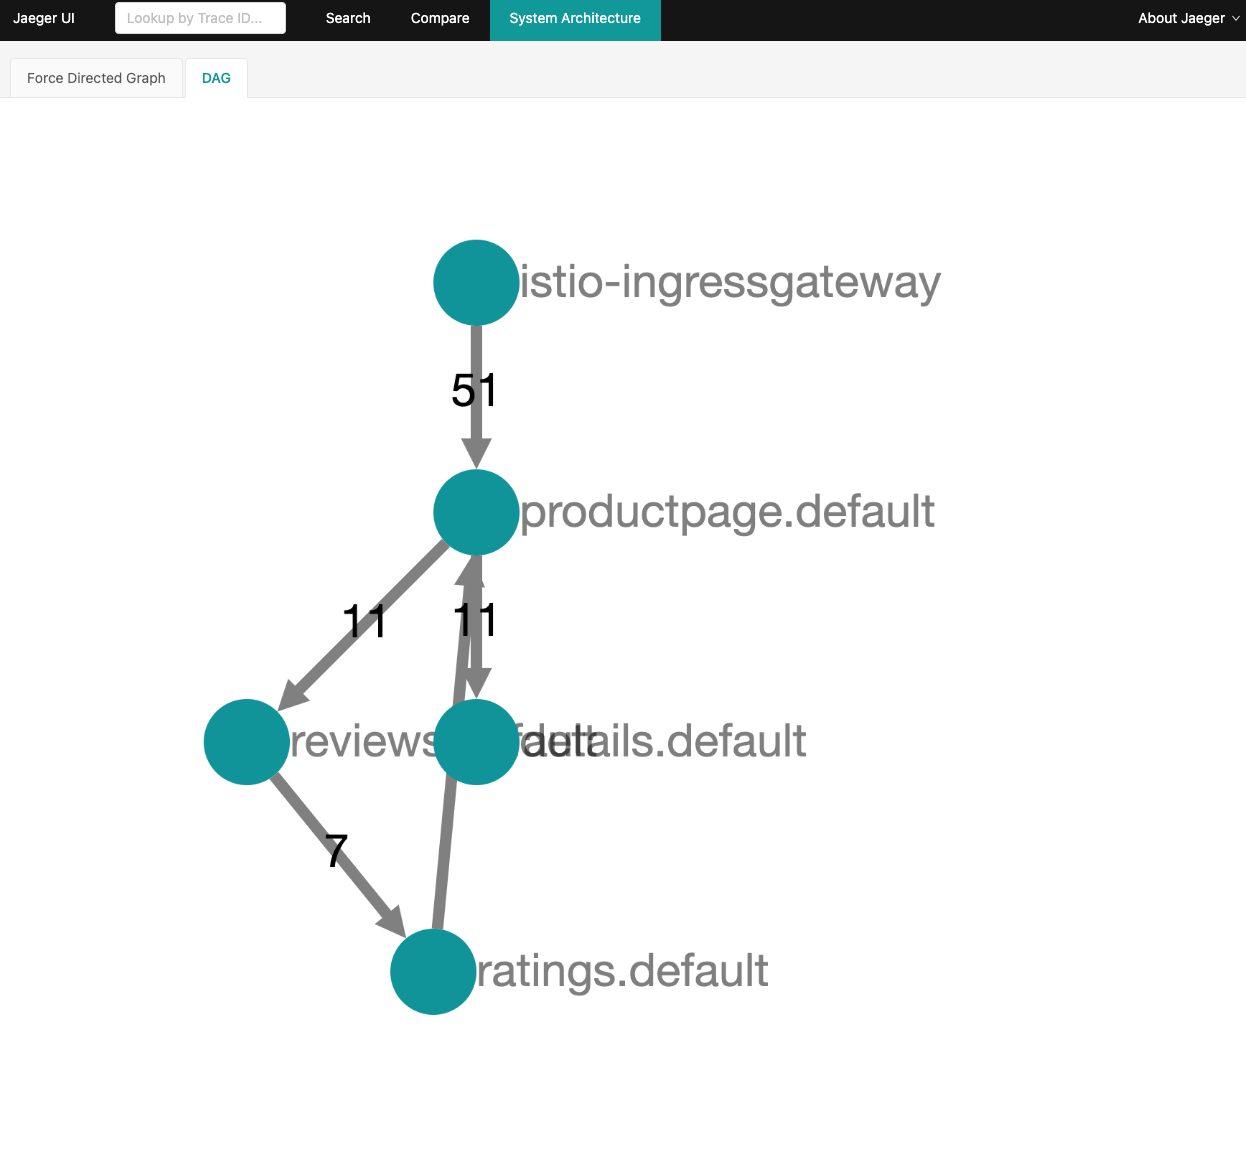
Kiali
$ istioctl dashboard kiali
Jaeger
$ istioctl dashboard jaeger
garafana
$ istioctl dashboard garafana
주의사항
만약 진행에서 잘 되지 않는 부분이 있다면 istioctl analyze 를 실행해서 문제가 없는지 살펴볼 수 있다.
istioctl analyze
기타
이건 스터디에서 안승규님이 알려주신 내용이다.
-
demo profile 에서는 jaeger의 메트릭 데이터가 inmemory 에 저장되지만 실제 production 에서는 별도의 스토리지(es) 등에 적재할 수 있다.
-
pilot 이 컨트롤 플랜에서 주요해서 메모리를 넉넉하게 주는게 좋다.
-
IstioOperator 를 설치할 때 spec 에 revision 을 지정해주어야 다음버전으로 올라갈 때 수월하다.
apiVersion: isntall.istio.io/v1alpha1 kind: IstioOperator ... spec: revision: "1-9-1" # 이부분이 리비전 지정 profile: default .... -
리비전을 지정하면
istio-injection=enabled이 동작하지 않는다.# 다음처럼 지정해야된다. $ kubectl label ns default istio.io/rev=1-9-1 -
IstioOperator Kind 를 여러개 설치해서 (profile : default / profile: empty 와 같이)
- istiod / ingressgateway / egressgateway 컴포넌트를 각각 별도로 관리할 수 있다.(개별 리소스 / HPA 를 따로 지정)
-
jager 와 kiali 의 다른점은? - jaeger 는 call trace 를 보는데 집중(Open telemetry), kiali 는 서비스의 graph 를 보는데 중점을 둔다
- kial 는 워크로드를 확인하고 jaeger 와 연결해서 trace 정보를 볼 수도 있다.
-
kubectl get istiooperators.install.istio.io -n istio-system을 입력하면 현재 설치된 istiod 컴포넌트를 확인할 수 있다. -
새로운 operator 버전업은 다음과 같이 진행된다.
- 새로운 버전의 istio operator 를 revision 지정하여 활성화 하고
- injection 설정을 새롭게 overwrite
kubectl label no default istio.io/rev=1-9-2 - 애플리케이션들을 전체 restart 하여 새로운 istio sidecar 가 구동되어 새로운 operator 에 연결되도록 확인
(
istioctl proxy-status) kubectl delete istiooperators.install.istio.io {name} --revision=1-9-1로 기존 컴포넌트 삭제
참고
- https://istio.io/latest/docs/setup/install/operator/
- https://istio.io/latest/docs/examples/bookinfo/
- https://istio.io/latest/docs/setup/getting-started/#determining-the-ingress-ip-and-ports
- https://istio.io/latest/docs/setup/additional-setup/config-profiles/
comments powered by Disqus